아이디와 비밀번호 암호화하기
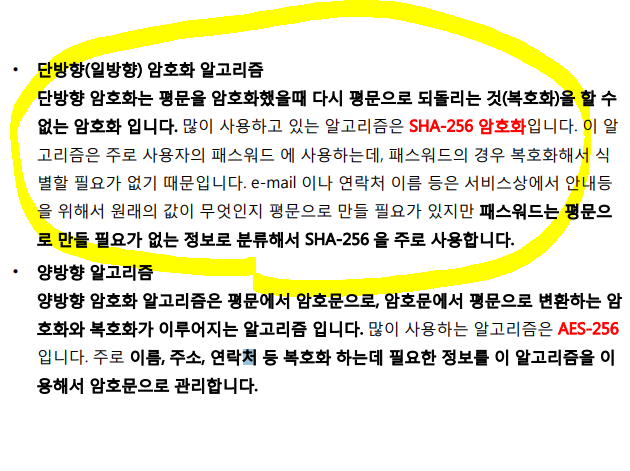
[해야 할 일]
(0) 라이브러리 설치
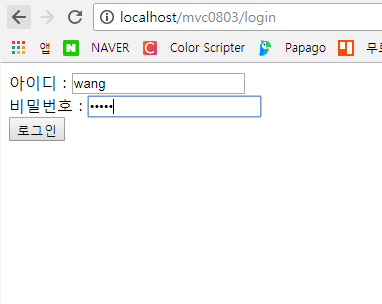
(1) ID와 비밀번호를 입력받을 View 생성
(2) AES256의 서비스 클래스 생성
(3) 서비스 클래스를 사용할 Controller 생성
(4) servlet-context.xml에 서비스 클래스 빈 등록
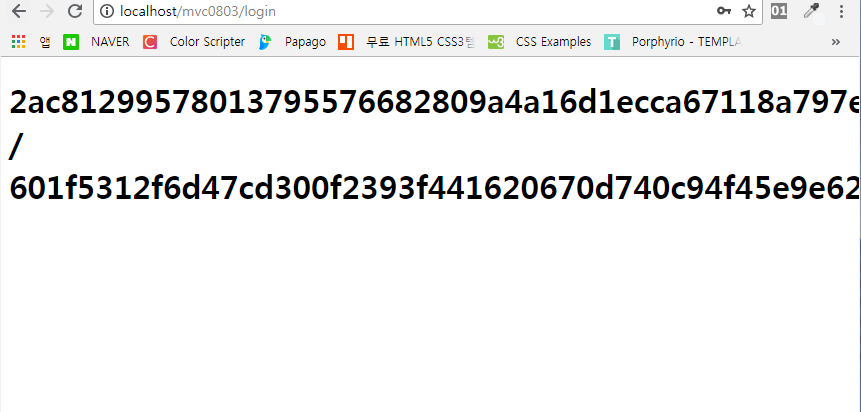
(5) 결과 응답 View 생성
(6) home.jsp에서 인덱스 생성
(0) 라이브러리 설치
http://www.oracle.com/technetwork/java/javase/downloads/jce8-download-2133166.html
에 접속해서 jce8을 다운로드한다.
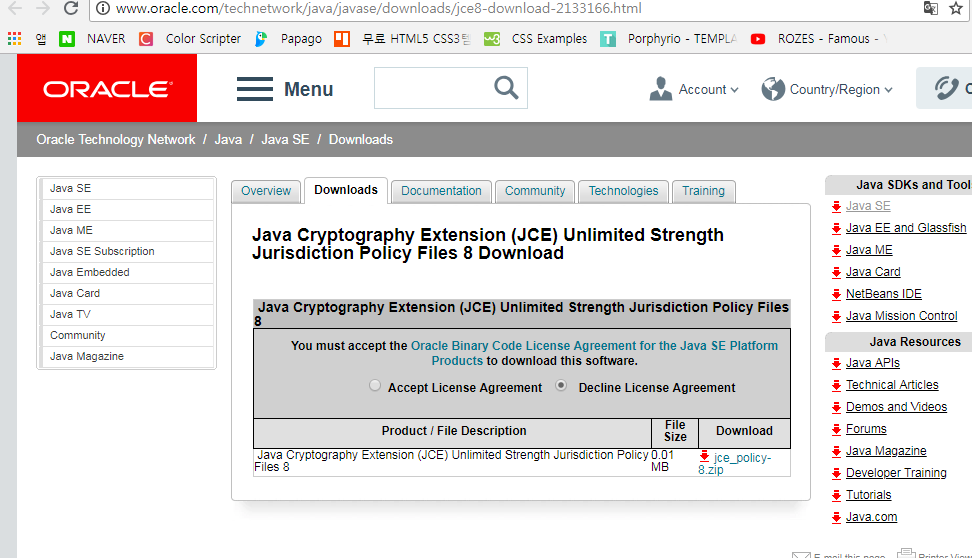
Accept License Agreement 후 Download.
압축을 풀면,
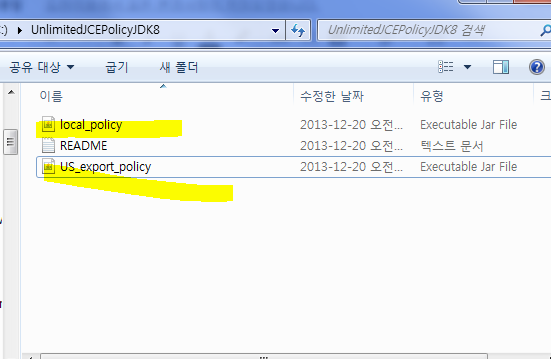
이 두 Jar 파일이 나온다.
(0)-1 Build Path - Configuration Build Path - Libraries - Add Library - Web App Libraries를 만든다. 그 후 ‘Add External Jars’로 저 두 파일을 Web App Libraries 안에 추가한다.
(0)-2 src - WEB-INF 안에 lib 파일을 만든 후 저 두 Jar 파일을 추가한다.

(0)-3 pom.xml에 commons-codec 라이브러리 추가
    <!-- 08/03 양방향 암호화/복호화를 위한 설정 -->
        <!-- https://mvnrepository.com/artifact/commons-codec/commons-codec -->
        <dependency>
            <groupId>commons-codec</groupId>
            <artifactId>commons-codec</artifactId>
            <version>1.10</version>
        </dependency>
(1) ID와 비밀번호를 입력받을 View 생성 [form.jsp]
<%@ page language="java" contentType="text/html; charset=UTF-8"
    pageEncoding="UTF-8"%>
<!DOCTYPE html PUBLIC "-//W3C//DTD HTML 4.01 Transitional//EN" "http://www.w3.org/TR/html4/loose.dtd">
<html>
<head>
<meta http-equiv="Content-Type" content="text/html; charset=UTF-8">
<title>Insert title here</title>
</head>
<body>
    <form method="post">
        아이디 : <input type="text" name="id"><br>
        비밀번호 : <input type="password" name="pwd"><br>
        <input type="submit" value="로그인">
    </form>
</body>
</html>
(2) AES256의 서비스 클래스 생성 [AES256Util.java]
이런 것이 양방향 암호화 코드 구나 하고 그냥 따라 쳐라..
package com.bitcampi.mvc0803;

import java.io.UnsupportedEncodingException;
import java.security.GeneralSecurityException;
import java.security.Key;
import java.security.NoSuchAlgorithmException;

import javax.crypto.Cipher;
import javax.crypto.spec.IvParameterSpec;
import javax.crypto.spec.SecretKeySpec;

import org.apache.commons.codec.binary.Base64;

/**
 * 양방향 암호화 알고리즘인 AES256 암호화를 지원하는 클래스
 */

public class AES256Util {

    private String iv = "00000000000000001";
    private Key keySpec;

     /**
     * 16자리의 키값을 입력하여 객체를 생성한다.
     * @param key 암/복호화를 위한 키값
     * @throws UnsupportedEncodingException 키값의 길이가 16이하일 경우 발생
     */


    public AES256Util() throws UnsupportedEncodingException {
        this.iv = iv.substring(0, 16);
        byte[] keyBytes = new byte[16];
        byte[] b = iv.getBytes("UTF-8");
        int len = b.length;
        if (len > keyBytes.length) {
            len = keyBytes.length;
        }
        System.arraycopy(b, 0, keyBytes, 0, len);
        SecretKeySpec keySpec = new SecretKeySpec(keyBytes, "AES");
        this.keySpec = keySpec;
    }

    /**
     * AES256 으로 암호화 한다.
     * @param str 암호화할 문자열
     * @return
     * @throws NoSuchAlgorithmException
     * @throws GeneralSecurityException
     * @throws UnsupportedEncodingException
     */
     public String encrypt(String str) throws NoSuchAlgorithmException,
    GeneralSecurityException, UnsupportedEncodingException{
     Cipher c = Cipher.getInstance("AES/CBC/PKCS5Padding");
     c.init(Cipher.ENCRYPT_MODE, keySpec, new IvParameterSpec(iv.getBytes()));
     byte[] encrypted = c.doFinal(str.getBytes("UTF-8"));
     String enStr = new String(Base64.encodeBase64(encrypted));
     //import org.apache.commons.codec.binary.Base64;
     return enStr;
     }

     /*복호화*/

     /**
      * AES256으로 암호화된 txt 를 복호화한다.
      * @param str 복호화할 문자열
      * @return
      * @throws NoSuchAlgorithmException
      * @throws GeneralSecurityException
      * @throws UnsupportedEncodingException
      */
      public String decrypt(String str) throws NoSuchAlgorithmException,
     GeneralSecurityException, UnsupportedEncodingException {
      Cipher c = Cipher.getInstance("AES/CBC/PKCS5Padding");
      c.init(Cipher.DECRYPT_MODE, keySpec, new IvParameterSpec(iv.getBytes()));
      byte[] byteStr = Base64.decodeBase64(str.getBytes());
      return new String(c.doFinal(byteStr), "UTF-8");
      }


}
(3)서비스 클래스를 사용할 Controller 생성
본인은 만들기 귀찮아서 ‘[SpringFramework] 단방향 암호화_sha256’에서 사용하던
컨트롤러를 조금 바꿔주었다.
package com.bitcampi.mvc0803;
import java.io.UnsupportedEncodingException;
import java.security.GeneralSecurityException;
import java.security.NoSuchAlgorithmException;
import org.springframework.beans.factory.annotation.Autowired;
import org.springframework.stereotype.Controller;
import org.springframework.ui.Model;
import org.springframework.web.bind.annotation.RequestMapping;
import org.springframework.web.bind.annotation.RequestMethod;
import org.springframework.web.bind.annotation.RequestParam;
@Controller
@RequestMapping("/login")
public class Sha256Controller {
/* @Autowired
Sha256 sha;*/
@Autowired
AES256Util aes;
@RequestMapping(method=RequestMethod.GET)
public String form() {
return "form";
}
@RequestMapping(method=RequestMethod.POST)
public String login(@RequestParam("id") String id, @RequestParam("pwd") String pwd, Model model) throws NoSuchAlgorithmException, UnsupportedEncodingException, GeneralSecurityException {
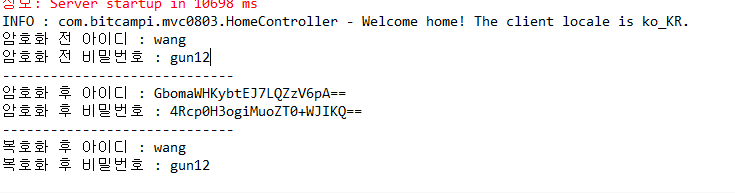
System.out.println("암호화 전 아이디 : " + id);
System.out.println("암호화 전 비밀번호 : " + pwd);
/* id = sha.encrypt(id);
pwd = sha.encrypt(pwd);*/
id = aes.encrypt(id);
pwd = aes.encrypt(pwd);
System.out.println("-----------------------------");
System.out.println("암호화 후 아이디 : " + id);
System.out.println("암호화 후 비밀번호 : " + pwd);
System.out.println("-----------------------------");
System.out.println("복호화 후 아이디 : " + aes.decrypt(id));
System.out.println("복호화 후 비밀번호 : " + aes.decrypt(pwd));
model.addAttribute("id", id);
model.addAttribute("pwd", pwd);
return "login";
}
}(4)servlet-context.xml에 서비스 클래스 빈 등록
<!-- 양방향 암호화의 서비스 클래스 빈 등록 -->
    <beans:bean id="AES256Util" class="com.bitcampi.mvc0803.AES256Util"/>
(5)결과 응답 View 생성
<%@ page language="java" contentType="text/html; charset=UTF-8"
    pageEncoding="UTF-8"%>
<!DOCTYPE html PUBLIC "-//W3C//DTD HTML 4.01 Transitional//EN" "http://www.w3.org/TR/html4/loose.dtd">
<html>
<head>
<meta http-equiv="Content-Type" content="text/html; charset=UTF-8">
<title>Insert title here</title>
</head>
<body>
    <h1> ${id} / ${pwd} </h1>
</body>
</html>
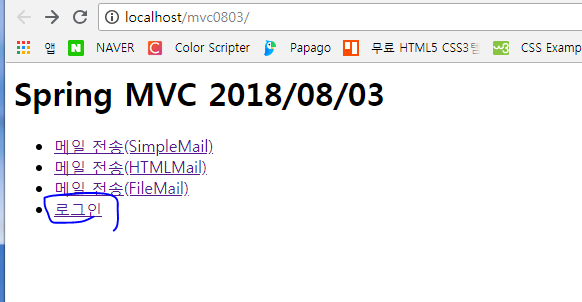
(5)home.jsp에서 인덱스 생성
<%@ taglib uri="http://java.sun.com/jsp/jstl/core" prefix="c" %>
<%@ page language="java" contentType="text/html; charset=UTF-8"
    pageEncoding="UTF-8"%>
<%@ page session="false" %>
<html>
<head>
    <title>Home</title>
</head>
<body>
<h1>
    Spring MVC 2018/08/03
</h1>

<ul>
    <li><a href="mail/simpleMail">메일 전송(SimpleMail)</a></li>
    <li><a href="mail/htmlMail">메일 전송(HTMLMail)</a></li>
    <li><a href="mail/fileMail">메일 전송(FileMail)</a></li>
    <li><a href="login">로그인</a></li>

</ul>

</body>
</html>
결과)
출처 : ryuinblog.blogspot.com/2018/08/springframework-aes256.html
'Back-end > JAVA & Spring' 카테고리의 다른 글
| [Spring] 메이븐(Maven)이란? (0) | 2021.04.20 |
|---|---|
| [Maven] Nexus란? (0) | 2021.04.20 |
| [Java] equals와 ==의 차이점 (0) | 2021.04.16 |
| [이클립스 오류] 서버 시작 타임아웃(Timeout) 오류 해결법 (0) | 2021.04.16 |
| 이클립스 웹프로젝트(WAR파일) Import, Export 하기 (0) | 2021.04.16 |


댓글